Sunday, August 22, 2010

A New Challenge

Its been a long time since I folded anything for a challenge, maybe as far back as the Spectacled Bear War. On the french origami forum this month the challenge is "Avatar", the movie by James Cameron of course. This month, Argil (the moderator of the challenges) introduced personal challenges. Until seconds ago, I figured there wasn't one directed at me because I haven't participated in so long. I just found out that I was challenged to fold the Thanator, the giant angry six-legged panther with frills. However, because I didn't read that before I decided to try folding a Hammerhead Titanothere, an elephantine creature with six legs and a giant head like a hammerhead shark. I really wanted to incorporate a color-changed fan on his back too, so I got to designing. I spent days trying to fold simple models, and eventually I caved in and used some good ol' techniques. Here is the crease pattern:
Photobucket

The top isn't as complicated as it looks, the creases are mostly hinge folds. Its based on a 20:20 grid, but I wouldn't suggest folding the whole grid. The top middle is the hammerhead part, and on either side there are flaps to make the color changed fan. The legs are the oddest part. The front pair of legs is made from the top and bottom of the diamond shapes in the middle by pulling them apart, and the back pair is made by folding the whole back section forward. Hopefully the pictures will help to clear some things up. Now it looks like I have to fold a panther with six legs!
Hammerhead Titanothere, Ryan MacDonell
Photobucket

Saturday, July 31, 2010

Drive. Stretch. Dream.

I was thinking about how to fold the Shad Valley logo. Its pretty simple, just 3 arrows coming out of one origin on a yellow background. I was having the hardest time trying to figure out how to make the curves in the lines to either side, and I finally decided that it looked a lot better if I left it simple. I folded the model from a windmill base, and ended up with this:
Shad Valley Logo, Ryan MacDonell
It shouldn't be too hard to reverse engineer from the photo, knowing what base its made from. I've also finished my Rat diagrams, 7 pages in total. It might be 8 by the time I get to adding explanations and step numbers. It seems like diagramming gets easier every time!

Saturday, June 19, 2010

Feeling Educated

Yesterday, I decided to celebrate the summer by folding. The fish base challenge on the french origami forum caught my eye, so I decided to see what I could do. Heres what I ended up with:
Snail 2, Ryan MacDonell
A nice simple snail, my second snail in fact. The idea for the snail took only seconds to make, but then I spent hours trying to figure out what to do with the shell. I'm happy with what I ended up with, although I wish that there was slightly more emphasis on the spiral. Now that I have the summer ahead of me, I decided to try diagramming again. I've had some ideas for my Loon for a while now, and I recently refolded my Rat 2 which I think will now diagram nicely. Lets hope it works out!

Sunday, April 18, 2010

More Minimalism

Playing around with color changes has always been a lot of fun to me, because I like the idea of seeing the other side of the paper. Today I was just fooling around with dragon curves when I picked up a small square (did I mention that I have a little notepad with (formerly) about 1000 5cm squares? Very handy for testing small things on the spot.) and started folding, just to see what kind of things that I could come up with. At first, I couldn't think of much. I decided to fold the bottom corner up to the middle of the top edge, and then base the rest on 90° folds. Eventually, I ended up with this (3 folds, despite there being 4 actual creases):
Shopping Man CP

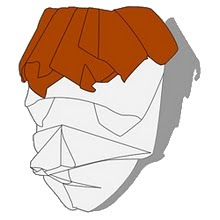
I knew it looked like something, but I couldn't say what. After turning it around a couple of times, I saw it: it was a hunch-backed man with a shopping bag, if you only looked at the colored parts. Of course, you can interpret it any way that you want to. If you fold with the colors inversed and use a background other than white, you could have a balding man with a moustache.
Shopping Man, Ryan MacDonell

EDIT: Three and a half years later, I keep seeing this design as a balding man with a moustache. As a result, I decided to fold it with the appropriate colours:
This might seem familiar...

Monday, February 8, 2010

Somewhere New

I had thought about how easy it would be to fold the Czech flag. The red and white parts would have diagonal folds on one end where the blue would slide in to make a triangle. I finally decided to try it, and halfway through folding I decided that I wanted more of a challenge. I decided to try making the flag so that if the blue section was on the left, the white would be on top and the red would be on bottom. This turned out to be a lot harder than I expected from a 8:8 grid. However, after several tries, I ended up with this: Flag of Czech Republic, Ryan MacDonell Flag of Czech Republic, Ryan MacDonell The second picture is actually the opposite side of the model from the first. I decided not to try making a CP, partly because it would be very hard to fold from because the layers need to be arranged a certain way. The model also has some really nice locks. Not only is the red and white section hard to get apart on its own, but when you add the blue part it can be locked in with diagonal folds on the inside.

Sunday, January 31, 2010

It's almost a new year

The Chinese new year is coming up on February 14th, and everyone if folding tigers. It seems to me that the Chinese zodiac challenge is the biggest unofficial challenge every year. This year is a bit different because tigers aren't exactly easy to fold, especially if you like color changes like I do. I doodled for a long time with just the stripes and found out that there are three (or maybe more) ways to make stripes. You can use offset reverse folds, spread pleats or use an offset grid. I tried to make tigers with all of these methods, and ended up liking the offset grid the most, even though my tiger didn't end up with legs. Thats why I decided to call it Tiger Pelt. Tiger Pelt CP The diagonal lines that make the grid offset starts from the top 1/4 of the square and goes to the bottom 1/8 in the corners. As you can see, it is based on an 8:8 grid. With the head (on the bottom of the CP), you can make all sorts of different things because there are plenty of flaps. I kept it simple and just added a nose, eyes and ears. You can thin the tail and the very top middle part of the model can make another stripe. Tiger Pelt, Ryan MacDonell Tiger Pelt, Ryan MacDonell

Monday, January 25, 2010

A Few More Sides

Ever since seeing Andrew's Pentagon Pig, I had to try making a model from a pentagon. I ended up getting a bit distracted and decided that folding an insect from a heptagon would be a better idea. It took me a while to find instructions on how to fold a regular heptagon from a square (in fact, the ones that I found weren't really good... they could do with some simplification), and then I started folding. At first, I had something that looked like a turtle with six legs, using only the corners of the heptagon for flaps. I gave up one that idea pretty quickly, and started doodling. A couple of folds into the doodle, I knew that I would end up with a dolphin. How do you get a dolphin from a heptagon? I'll show you how.
Dolphin CP

Thats how. There are quite a few details to be added after that. With a crimp near the top, you can form the head section. Then you can make the head with some reverse folds and a petal fold. Another reverse fold makes a flipper, and the excess of the body can be folded beneath. The flipper actually took me seven tries to get it right, which ended up being on the final model. The tail just needs to be folded downwards and thinned with two layers tucked inside and a closed sink. A couple of folds underneath can make a nice lock in the middle of the tail. Here are some pictures of my final dolphin.
Dolphin, Ryan MacDonell